
In this post, we are going to do something really cool. We are going to set up a CI and CD server for a django app with the help of Jenkins. But first, let's see why we need such a server.
In the previous post, we deployed our application to Digital Ocean and now it is up and running:
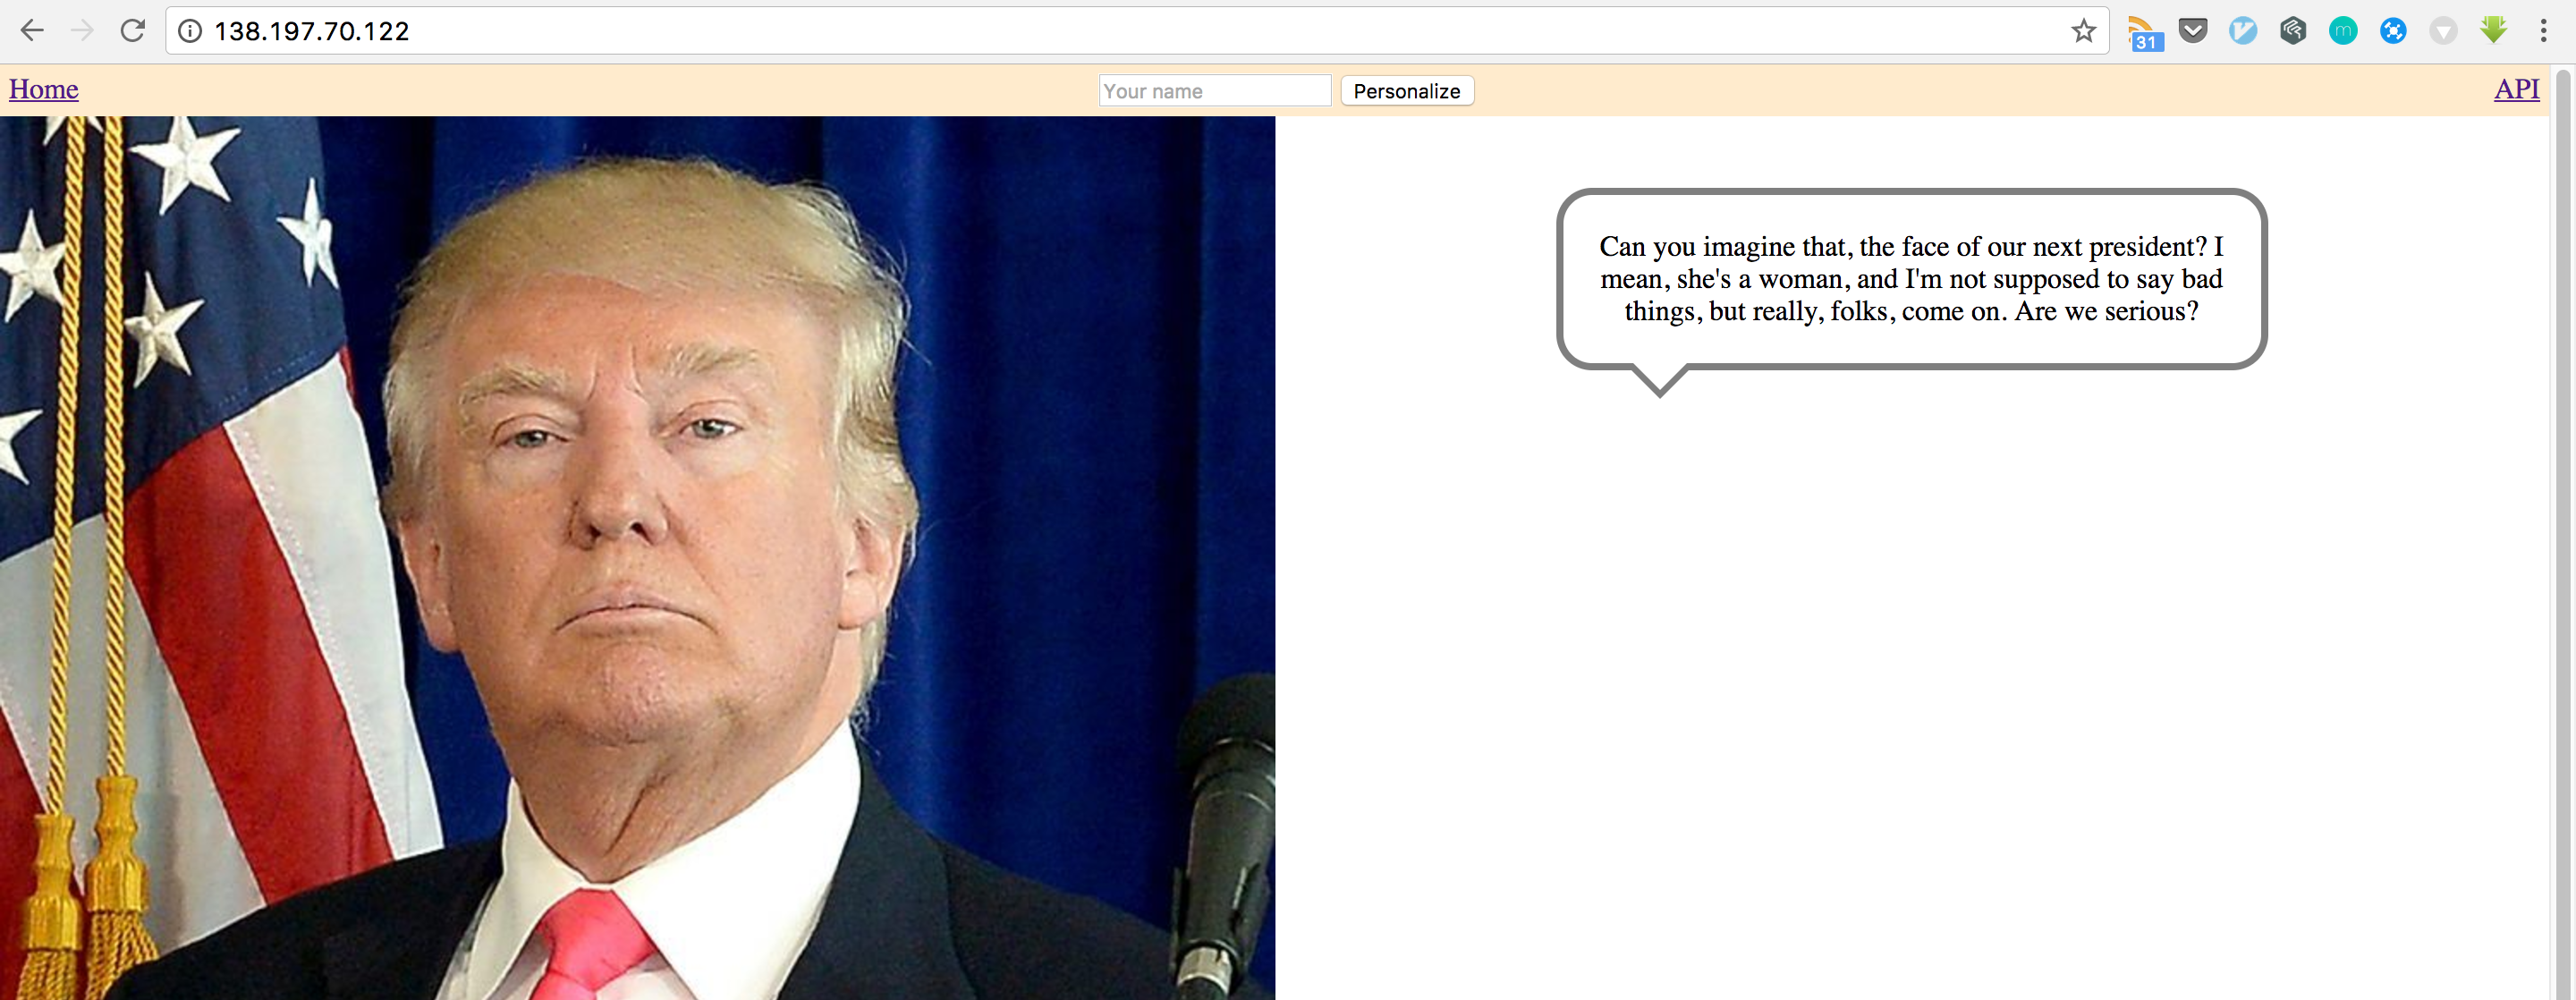
Now, let's try to update it.
By the way, to follow along this tutorial you should fork this repo if you didn't do so in the previous post. The reason is that we will play around with the app to see our CI and CD server in play later on.
OK, now let's go ahead and change something in the template file djtrump/templates/djtrump/index.html. Find the input element whose placeholder says Your name and change it to Type your name:
# Change this
<input type="text" placeholder="Your name" name="name" value="{{ name }}">

# to this
<input type="text" placeholder="Type your name" name="name" value="{{ name }}">
Commit the change and push it to the remote repo:
git commit -am 'Change input placeholder'
git push origin master
Now, ssh into your server:
ssh root@104.236.57.112 // change this to the IP address of your own server
Go to the project folder and pull the new code from the repo:
cd djtrump
git pull origin master
Make sure origin refers to your fork of the app. Now, open the browser and type the server IP and you will see that the placeholder changed. Now, this is a very simple scenario. When we make changes to models or requirements, we will also have to run migrations, install dependencies and restart the nginx. Besides, we are not considering tests here. In the real world, you should run tests in the prodcution server as well and make sure everything is working.
Although, this is simple, it is very clumsy and error prone to do it manually. Wouldn't be great if you as a developer just pushed your code into the repository, leave the rest to be done by itself and be notified when everything is done?
This is exactly what we will do now. At the end, we will make some changes to the code and push it to the remote repo. Then, our jenkins server will pull the code, run the tests and if they pass successfully deploy the changes to the app server. After all this, it will also notify us through Slack.
Cool right?!
Enough talk, let's fight!
Create a new server and install Jenkins
Go through exact same steps as in the previous post to create a droplet with the only difference of name. Name it djtrump-jenkins. Wait a few seconds and when your server is ready, ssh into it:
ssh root@192.241.166.116 // replace this IP address with yours
Install Jenkins:
wget -q -O - https://pkg.jenkins.io/debian/jenkins-ci.org.key | sudo apt-key add -
sudo sh -c 'echo deb http://pkg.jenkins.io/debian-stable binary/ > /etc/apt/sources.list.d/jenkins.list'
sudo apt-get update
sudo apt-get upgrade
sudo apt-get install jenkins
Now, if you go to JENKINS_IP_ADDRESS:8080 on your browser, you should see Jenkins up and running:
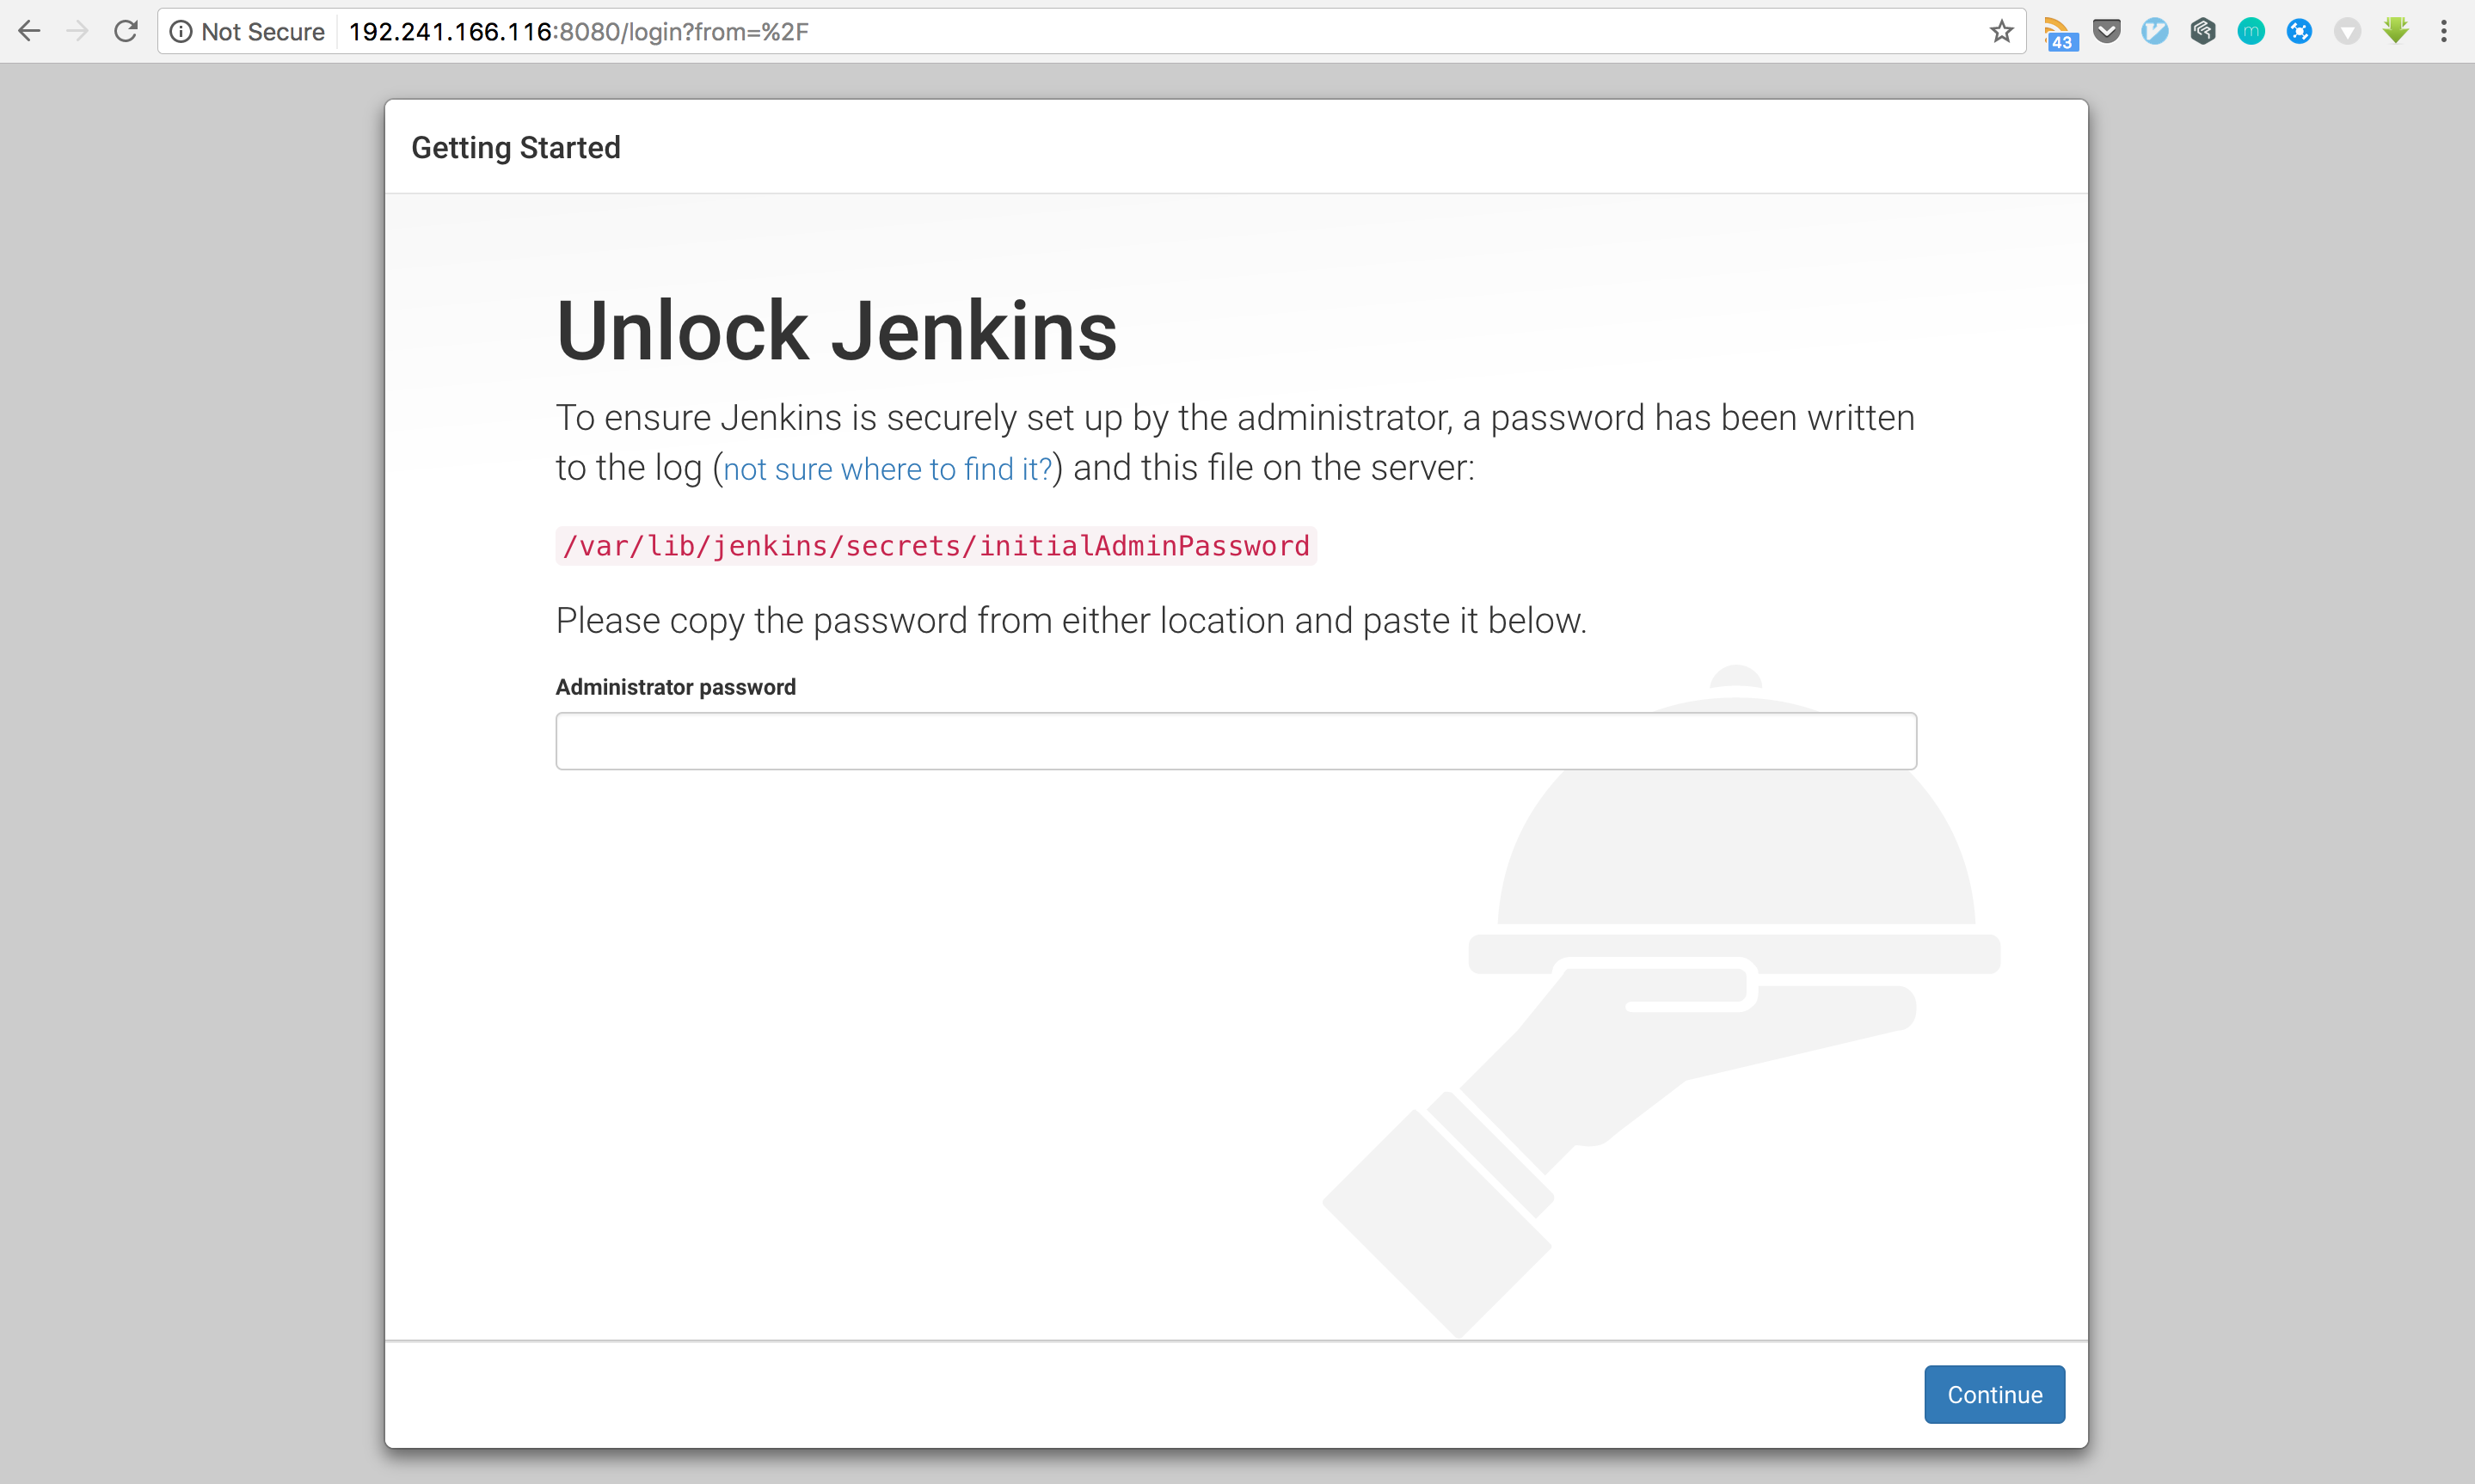
Open to /var/lib/jenkins/secrets/initialAdminPassword, copy your password and paste it on the form. Click on Continue.
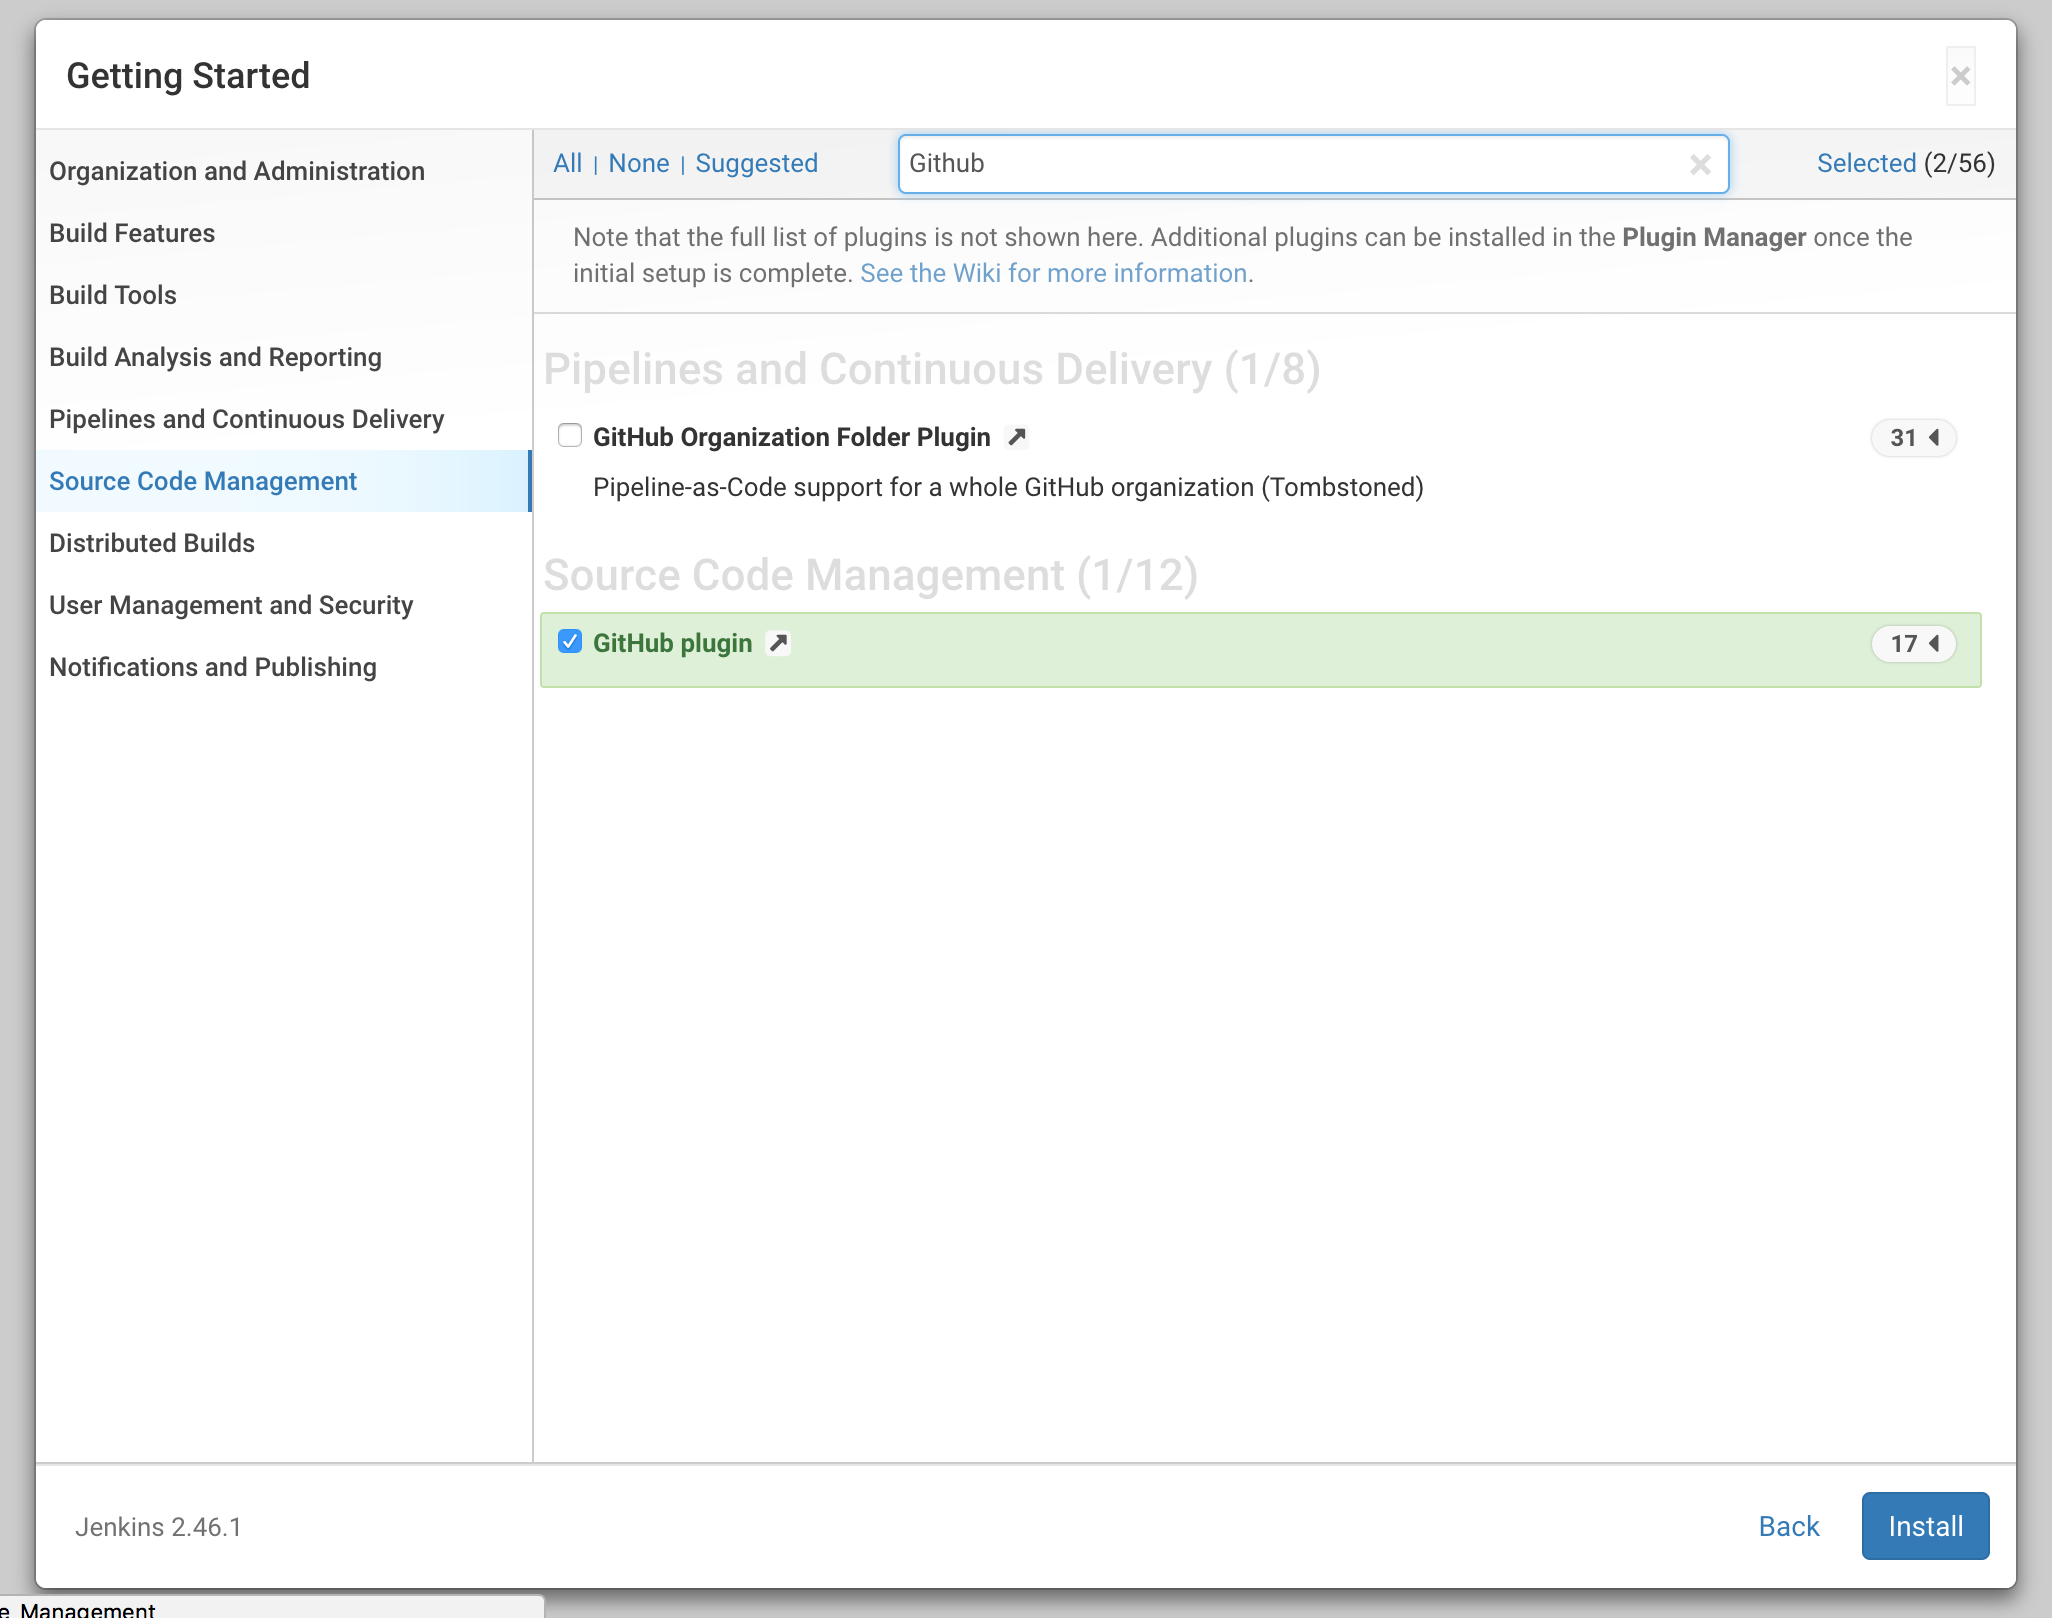
After a moment, Customize Jenkins page opens. There, click on Select plugins to install.
On this page, search for Github and Pipeline plugins and check them. Click install:
After everything installs, on the next page, fill in the details and create a user. Click on Start using Jenkins.
Set up a Jenkins Job
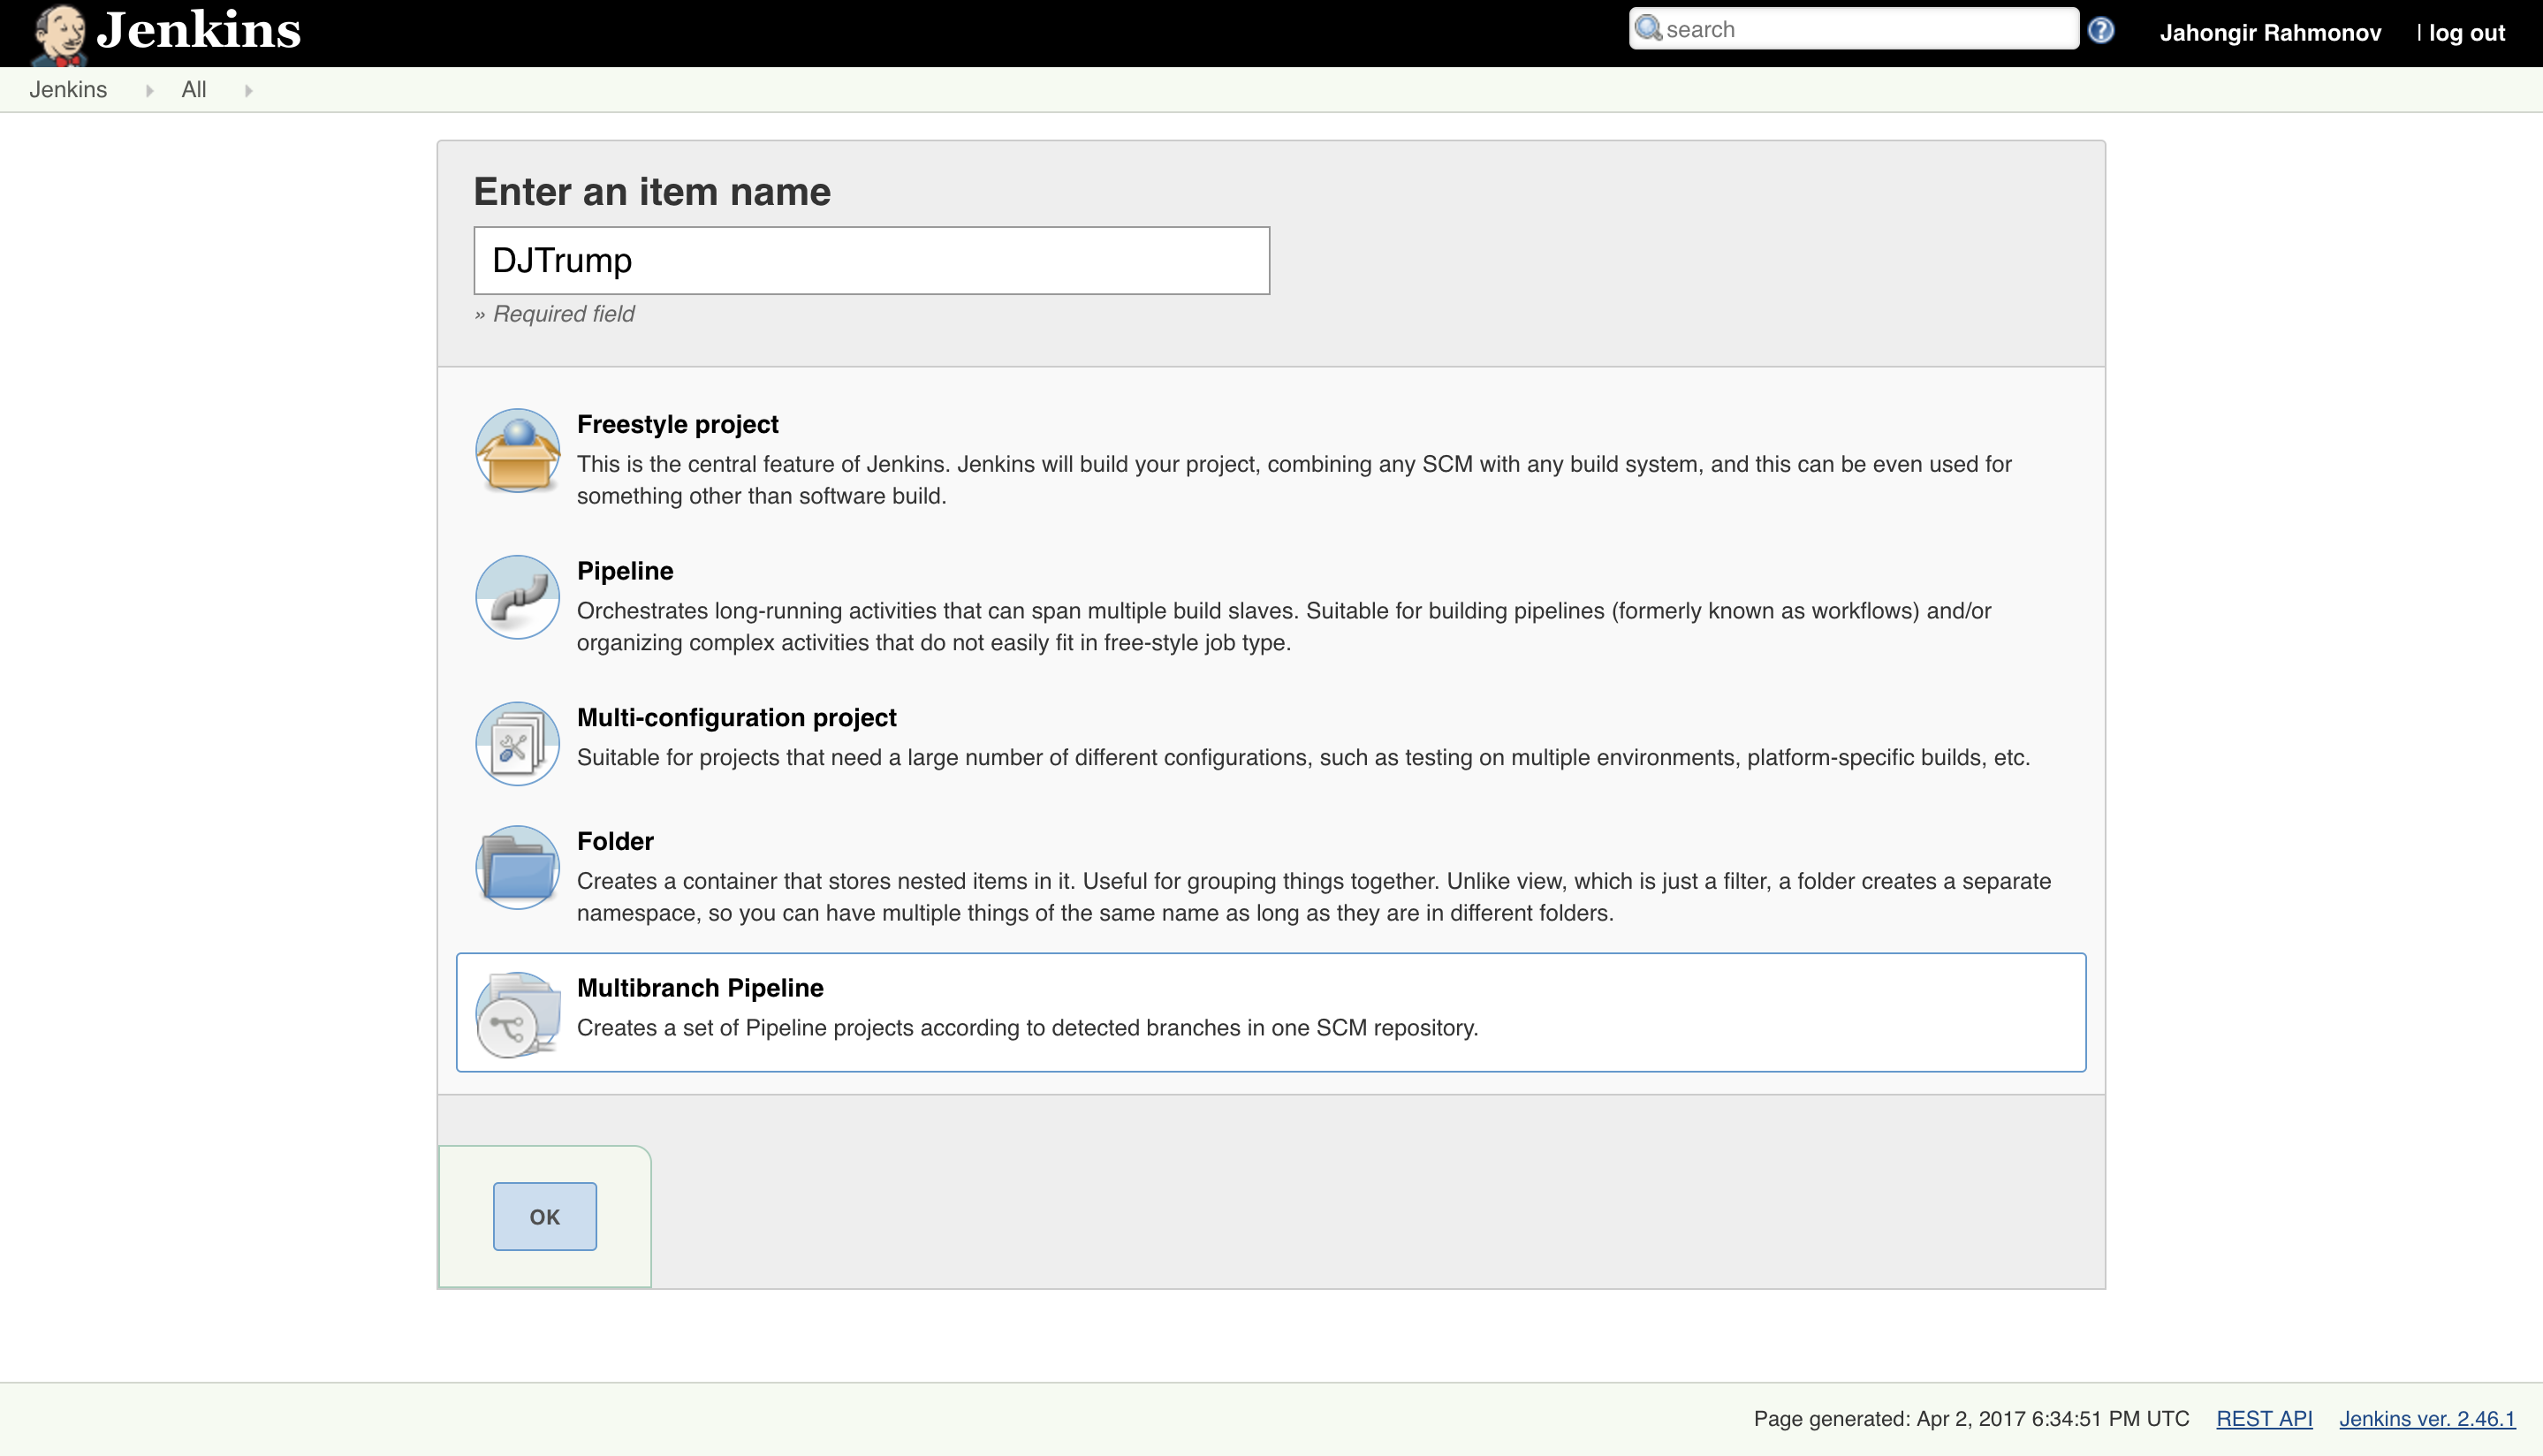
Click on New Item or create new jobs to get started.
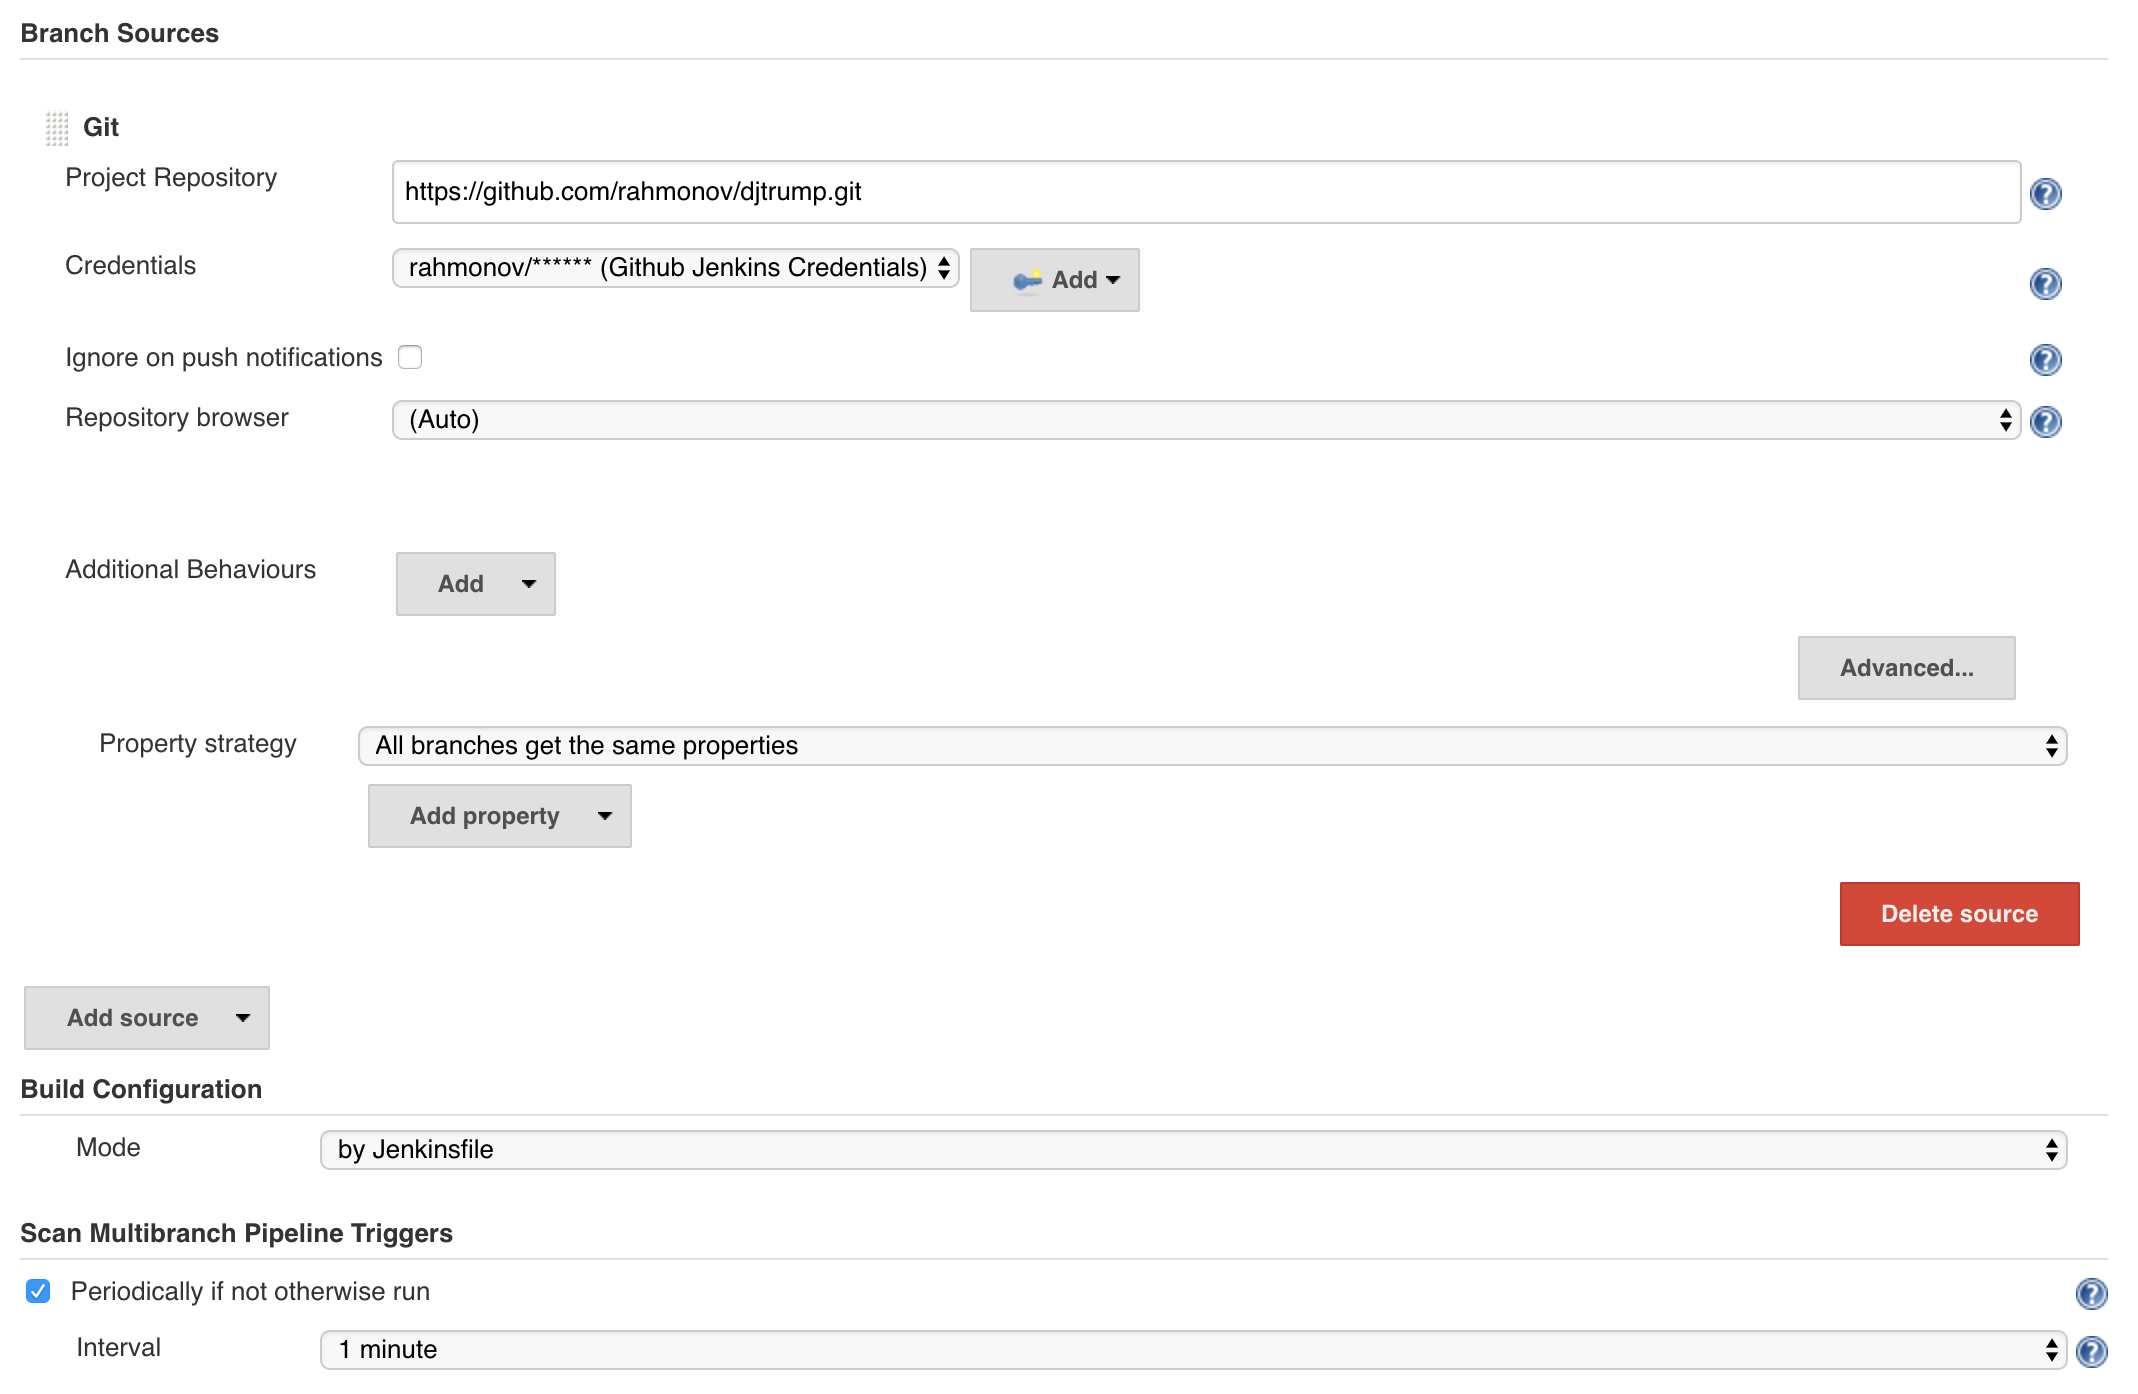
On the new job page, name the item DJTrump and choose Multibranch pipeline:
On the configuration page, click on Add source and choose Git. Fill in the details of your repository in Github. Then, check Periodically if not otherwise run and leave the interval of 1 minute:
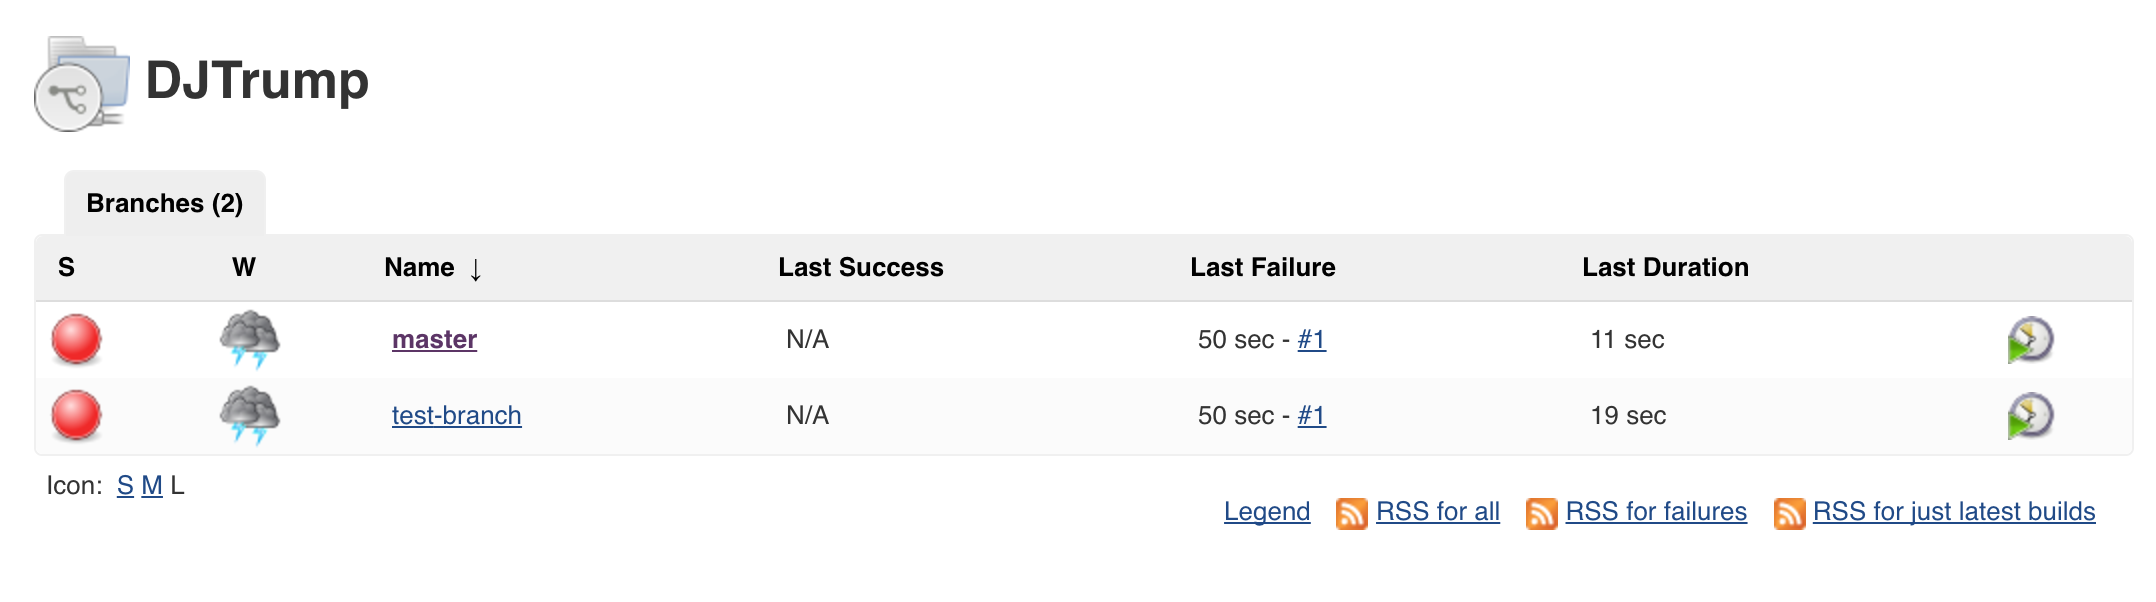
Click Save. You will see that Jenkins will immediately start to build the project. As we chose Multibranch mode, it will start to build for all branches. However, you will see that both branches will fail:
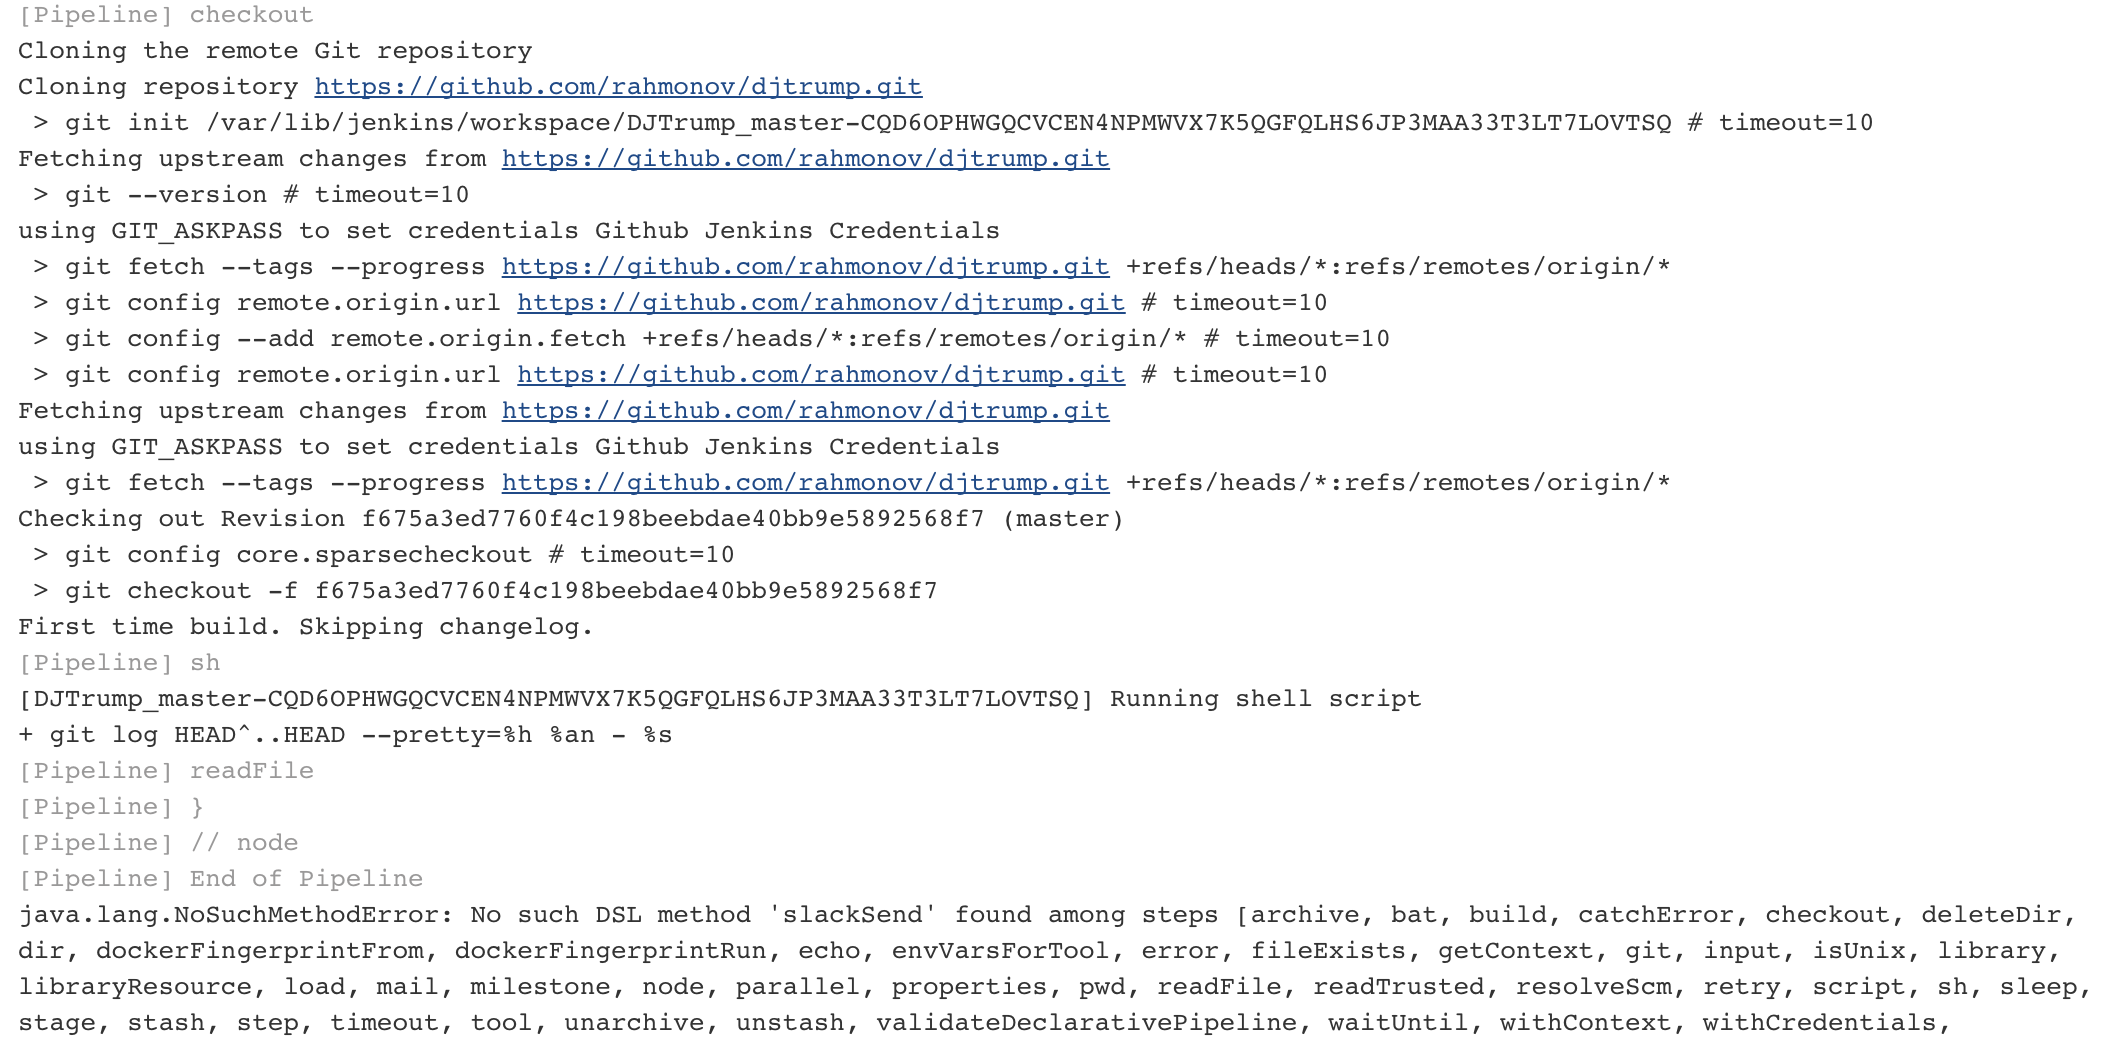
To see what is going on, click on master and on the next page, click on #1 in the Build History list. Then, on the next page, click on Console Output in the left sidebar. You will see the logs which show that Jenkins cloned the project and then encountered an error that says: No such DSL method 'slackSend' found among steps. So, it tried to notify us through slack that a Jenkins build started and it got this error:
But wait! How did Jenkins know what to do in the first place? How did it know that it should send a slack message saying that a build started?
If you go to the root folder of the project you will see a file named Jenkinsfile:
#!groovy

node {

    try {
        stage 'Checkout'
            checkout scm

            sh 'git log HEAD^..HEAD --pretty="%h %an - %s" > GIT_CHANGES'
            def lastChanges = readFile('GIT_CHANGES')
            slackSend color: "warning", message: "Started `${env.JOB_NAME}#${env.BUILD_NUMBER}`\n\n_The changes:_\n${lastChanges}"

        stage 'Test'
            sh 'virtualenv env -p python3.5'
            sh '. env/bin/activate'
            sh 'env/bin/pip install -r requirements.txt'
            sh 'env/bin/python3.5 manage.py test --testrunner=djtrump.tests.test_runners.NoDbTestRunner'

        stage 'Deploy'
            sh './deployment/deploy_prod.sh'

        stage 'Publish results'
            slackSend color: "good", message: "Build successful: `${env.JOB_NAME}#${env.BUILD_NUMBER}` <${env.BUILD_URL}|Open in Jenkins>"
    }

    catch (err) {
        slackSend color: "danger", message: "Build failed :face_with_head_bandage: \n`${env.JOB_NAME}#${env.BUILD_NUMBER}` <${env.BUILD_URL}|Open in Jenkins>"

        throw err
    }

}
This is where all the steps that Jenkins should follow are described. Let's break it down.
The first element you will notice is node. Node is a very crucial player which allocates an executor and workspace for the pipeline. Think of it as a worker that does the job. Inside node, there is one try/catch block. It is very simple. It tries to do something and if it fails it notifies us in Slack and throws error. Inside the try block, there are four stages. First, it pulls the code from the source control and notifies us in Slack that a build has started and what has changed in the code. We will see the end result later. Then, it runs tests which are located in the djtrump/tests folder. They are just a couple of simple tests which are intended for demonstration purposes only. Then, it runs the deployment script deployment/deploy_prod.sh. And finally, it will notify us that the build has been successful in Slack.
Now, let's see what is inside that deployment script:
#!/bin/sh

ssh root@104.236.57.112 <<EOF
  cd djtrump
  git pull
  source /opt/envs/djtrump/bin/activate
  pip install -r requirements.txt
  ./manage.py migrate
  sudo supervisorctl restart djtrump
  exit
EOF
It is also very simple. We are sshing into our server, going to the project folder, pulling the code from the repository, activating the virtual environment, installing the requirements, running migrations and restarting the djtrump project with supervisor. Just like what we did when we manually updated our app in the server.
Now, let's get back to what the Jenkins error message was saying. It said that it could not find slackSend method. The reason is that we have not installed the Slack plugin. This is how Jenkins works, with the help of plugins. You want to work with Github, you install Github plugin. You want to work with Slack, you install the Slack plugin and etc. This is how it is done: Go to the main page and click on Manage Jenkins. There, choose Manage Plugins. Click on the Available tab and search for the Slack Notification Plugin. Check it and click on Install without restart. After it gets installed, click on Restart Jenkins when installation is complete and no jobs are running.
After it restarts, log in.
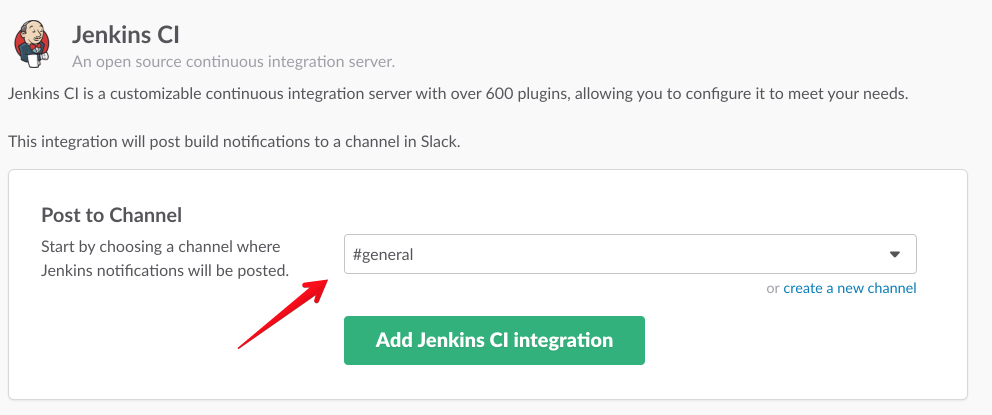
We also need to install Jenkins plugin on the Slack side. Assuming you already have a slack team, go to https://my.slack.com/services/new/jenkins-ci. There, choose #general channel and click on Add Jenkins CI integration:
On the bottom of the next page, you will find some settings such as your Jenkins integration token. Save settings. Now, open another browser window. Go to your Jenkins server, navigate to Manage Jenkins -> Configure System and find Global Slack Notifier Settings there. Fill in team subdomain, integration token and channel:
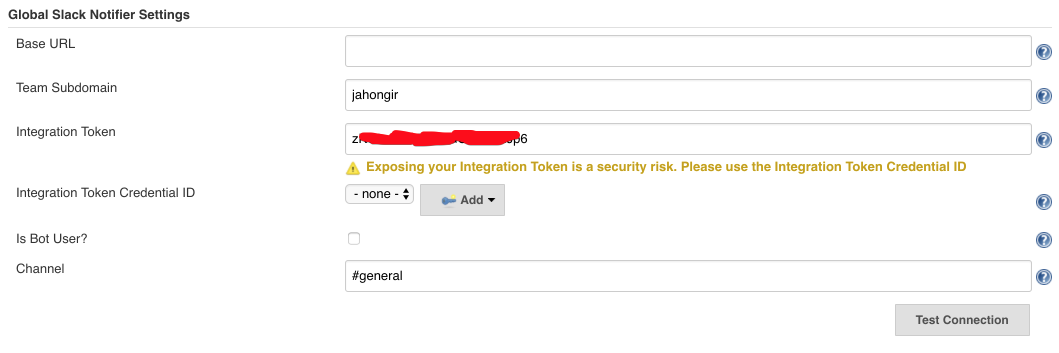
Save!
If you did everything correctly, slack messaging will work now. However, there are a couple more things we should do to avoid more errors. First of all, we should install virtualenv for python:
ssh root@104.236.57.112  // replace this with the IP of your own Jenkins server
apt install python3-pip
pip3 install virtualenv
Now, we should install postgresql and create a database so that it will not complain while running tests. If you go to djtrump/settings/base.py, you will see that our database configuration looks like this:
DATABASES = {
    'default': {
        'ENGINE': 'django.db.backends.postgresql_psycopg2',
        'NAME': os.environ.get('DATABASE_NAME', 'djtrump'),
        'USER': 'djtrumpuser',
        'PASSWORD': 'password',
        'PORT': '5432',
    }
}
So, we should create a database with name djtrump whose owner is djtrumpuser with password password.
First, install postgresql:
apt-get install postgresql postgresql-contrib
Log into the postgres interactive shell:
sudo -u postgres psql
Create the database, the user and make the user owner of that database:
postgres=# CREATE DATABASE djtrump;
postgres=# CREATE USER djtrumpuser WITH PASSWORD 'password';
postgres=# GRANT ALL PRIVILEGES ON DATABASE djtrump TO djtrumpuser;
postgres=# \q
Now open /etc/postgresql/9.5/main/pg_hba.conf, find the line that says the following:
# "local" is for Unix domain socket connections only
local   all             all                        peer
and change peer to md5 because we will be using username/password combination to connect to postgresql:
# "local" is for Unix domain socket connections only
local   all             all                        md5
Now, restart postgresql:
sudo service postgresql restart
And there is one last thing that we should do. As we saw in the deployment script, we are sshing from the Jenkins server to the DJTrump app server. However, it is not allowed yet. To allow this, we need add the public key of the Jenkins server to the authorized keys of the app server. To do that, log in as jenkins user coz this is the user that will be running the jobs:
sudo su - jenkins
Type this and do not enter passphrase:
ssh-keygen -t rsa
Open ~/.ssh/id_rsa.pub and copy the content. Now, in another terminal tab ssh into the app server:
ssh root@104.236.57.112 // replace the IP
Open ~/.ssh/authorized_keys and paste the public key you copied here. Save!
Now, check if you can ssh into the app server from the Jenkins server as the user jenkins. From the previous tab, type this:
ssh root@104.236.57.112 // replace the IP
Type yes and you should see that you are connected without any password. Congrats! We should be all set.
Time to check!
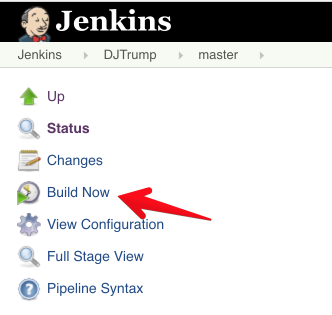
Navigate to Jenkins root -> DJTrump -> master and once there click on Build now to start a build manually:
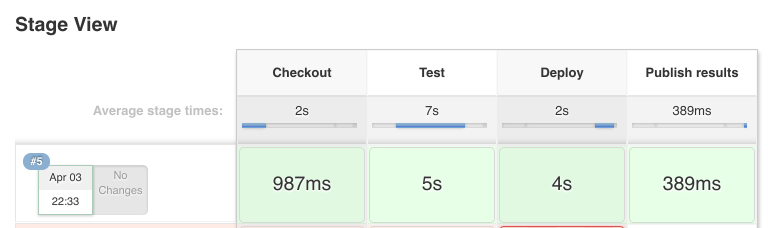
And you will see that it will start a build and go through all 4 stages we describe at the beginning:
If you go to your Slack, you should see some messages in #general channel:

Awesome, right?! But that is not so good if we have to make build manually, right?
Fortunately, that's also taken care of. Go to your djtrump and make some kind of change. For example, change the placeholder again to read NNAAAMMMEEE like we did at the beginning of this tutorial. Then, stage and commit the changes:
git commit -am 'Change placeholder to read NNAAAMMMEEE'
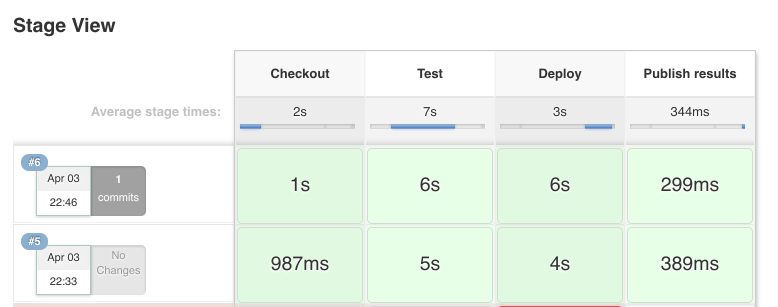
In a minute, in your jenkins server you will see that the next build has started and ended successfully:
And if you visit your app, you will see that changes have taken place:

Hooray! Isn't awesome? You just pushed your code and everything else happened by "itself". Ther is even more. Check your slack. You have been notified about the start, what has changed and the end of the build. I love this kind of automation.
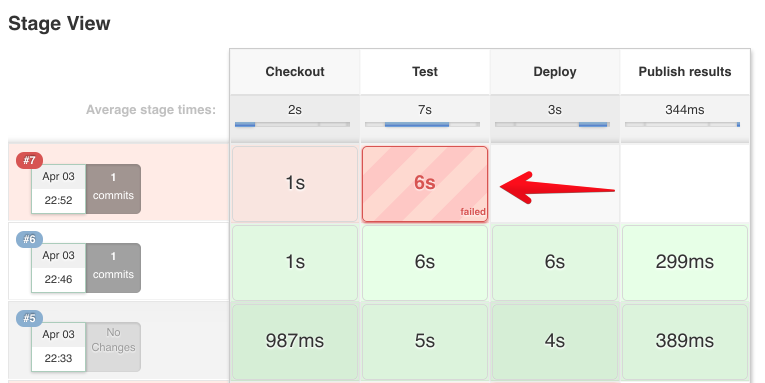
Now, go ahead and play around with it. Try to make one of the tests fail and you will see that the failing code will not be deployed! It will stop in the Test stage:
In Slack, you will see this fun message:
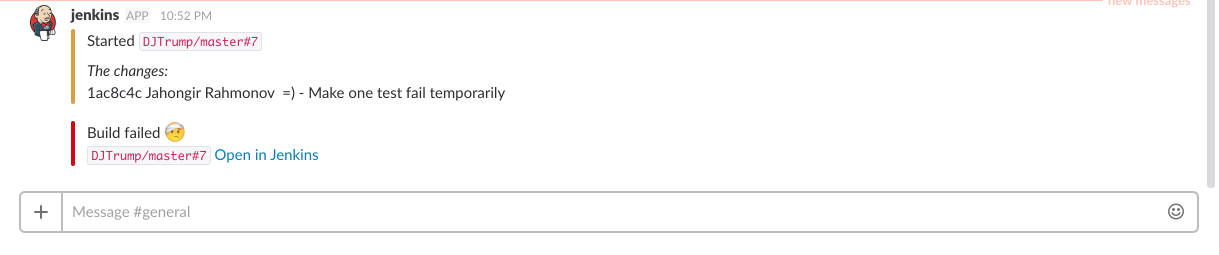
If you click on Open in Jenkins and you will taken to that exact failed build.
Once again, I love this kind of automation! And you should too!
Huh, that was quite a ride! We have learned a lot!
If you encountered a problem along the way, feel free to leave a commend or email me. Will be glad to help!
Fight on!